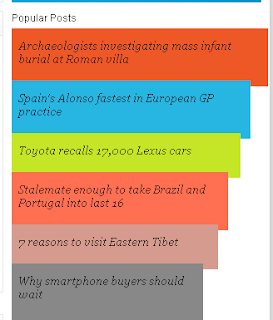
Popular Post widget has been published by Blogger long time ago . A helpful widget that show the most viewed posts in blog . In this post ,I will show you how to style this widget ,add colors to this one to make it look nice and exciting :D
This post contain Blogger API code ,CSS and a little of Javascript ,so it will be easier if you are familiar to them . Please read my posts on Blogger API to understand Blogger API and it structure , the 'section' and 'widget' code . If you are not sure on what is going on ,pls do backup template ,it will be helpful in case of any error .
Demo here
How to do it
1,Go to Dashboard ->Template - > Edit HTML
2,Add the CSS code right before ]]></b:skin>
.mostpopular {
list-style: none outside none;
margin: 0.3em 0 !important;
padding: 0;
}
.mostpopular_li {
background-image: none !important;
border: 0 none;
list-style: none outside none !important;
margin: 0 0 -7px !important;
padding: 13px 0 8px 8px !important;
position: relative;
width: 100%;
}
.mostpopular_li.color0 {
background-color: #EE5826 !important;
width: 100%;
}
.mostpopular_li.color1 {
background-color: #27B6E2 !important;
width: 93%;
}
.mostpopular_li.color2 {
background-color: #C5E627 !important;
width: 89%;
}
.mostpopular_li.color3 {
background-color: #FF6F51 !important;
width: 84%;
}
.mostpopular_li.color4 {
background-color: #D59B8E !important;
width: 80%;
}
.mostpopular_li.color5, .mostpopular_li.color6, .mostpopular_li.color7, .mostpopular_li.color8, .mostpopular_li.color9, .mostpopular_li.color10, .mostpopular_li.color11, .mostpopular_li.color12, .mostpopular_li.color13, .mostpopular_li.color14, .mostpopular_li.color15 {
background-color: #888888 !important;
width: 74%;
}
a.barlinko {
background: none repeat scroll 0 0 transparent;
display: block;
font: italic 13px georgia,serif;
margin: 0 6px 0 0;
padding: 0;
text-decoration: none !important;
}
a.barlinko:hover {
color: #FFFFFF;
}
.barco {
display: block;
right: 0;
}
.mostpopular_li img {
margin-top: 15px;
position: absolute;
right: 5px;
}
a.thethingwithc {
border: 0 none !important;
color: #FFFFFF !important;
display: block;
font-family: arial;
font-size: 11px;
font-weight: bold;
padding: 0 9px 0 0;
text-align: right;
text-decoration: none !important;
}
3,In template ,choose the position where you want to insert this widget ,and then add the code
<b:section id='sidebar' showaddelement='yes'>
<b:widget id='PopularPosts1' locked='false' title='Popular Posts' type='PopularPosts'>
<b:includable id='main'>
<div id='sidebartitlewrapper'>
<b:if cond='data:title'><h3><span><data:title/></span></h3></b:if>
</div>
<div class='sectioncont'>
<ul class='mostpopular'>
<script type='text/javascript'>
//<![CDATA[
var i=0;
//]]>
</script>
<b:loop values='data:posts' var='post'>
<script type='text/javascript'>
//<![CDATA[
document.write ('<li class="mostpopular_li color'+i+'">');
var i= i +1;
//]]>
</script>
<a class='barlinko' expr:href='data:post.href'><data:post.title/><data:post.id/></a>
<span style='display: inline-block;width:100%;'>
<span style='float: left;font-size:10px;color:#f5f5f5;'> </span>
<span class='cb'/>
</span>
<script type='text/javascript'>
//<![CDATA[
document.write ('</li>');
//]]>
</script>
</b:loop>
</ul>
</div>
<b:include name='quickedit'/>
</b:includable>
</b:widget>
</b:section>
Insert this code into sidebar as other script . Do not insert in other section element .For the question what 'section' is ,pls read this post
Save changes and go back to Dashboard .
4, Click on View blog to see the result . We need some work here
Click on the wrench icon in the right corner of widget
I marked it with a circle .
A dialog will display . Change the setting as picture bellow

Save settings .
That's all for this widget . Hope it works ^^


0 comments:
Post a Comment